In this tutorial, we will build a complete website using notepad.
Step 1. Get a Better notepad
First of, you need a good text editor to write code. plain notepad is not enough.
For this tutorial, I will be using notepad ++.
![]()
![]()
![]()
![]()

Alternatively, you can use atom text editor or Sublime Text. Both are very good.
Atom and notepad++ are free.
 |
 |
Step 2. Create the landing page for your website
If you are not familiar with HTML yet, I would recommend taking a fast paced HTML tutorial here.
Let us build our landing page based on popular CSS framework Bootstrap.
We are using a framework because:
- You don’t have to reinvent the wheel! CSS frameworks have many re-usable constructs
- Your website works on all browsers & devices out of the box
- You don’t have to write lots of code
If you want to learn Modern HTML from scratch, bookmark and read this tutorial:
a Modern HTML Tutorial.
Here is the source code of our landing HTML page (index.html):
veggso_com.zip
In the source you can see that we have added a custom CSS file below the Bootstrap CSS:
![]()
![]()
![]()
![]()

The body HTML is updated to add a navigation menu, heading and three small columns.
Step 3. Get website Domain and Hosting
The next step is to get our website online so that the whole world can see it.
We will host our website with SiteGround Web hosting.
Always choose the best hosting service for your websites.
Siteground is known for its super fast web servers, security features and awesome support.
This link takes you to the best hosting offer they have:
http://fastwebstart.com/go/siteground
Choose the hosting option with multiple websites feature:
![]()
![]()
![]()
![]()

You can add more websites to the same account by choosing that option.
Enter the domain name you have selected and make sure there is no spelling mistake!
![]()
![]()
![]()
![]()

Also remember to use a long, good password. Keep the password safely somewhere.
![]()
![]()
![]()
![]()

After completing the signup, wait for the email with login information to arrive in your email inbox.
![]()
![]()
![]()
![]()

Once you have the email, login to your customer area:
![]()
![]()
![]()
![]()

![]()
![]()
![]()
![]()

Bookmark that page so that you can quickly login to your hosting control panel next time.
Click on ‘My Accounts’ tab:
![]()
![]()
![]()
![]()

You can see all important information about your website here. Clicking on the Control panel link will take you to the hosting control panel where you can do most of the website setup tasks like installing software, accessing logs and so on.
At the moment, we just want to upload the HTML/CSS files to our website. We can upload the files using simple FTP.
![]()
![]()
![]()
![]()

Step 4: Upload files to your website
We will use the Free Filezilla FTP client to upload our web pages to the new website.
Download and install FileZilla FTP client first.
After installing Filezilla, login to your website through FTP. Use the FTP login information in your hosting customer area to login (The server name and the user name is shown in the hosting customer area). The password is same as the one you had entered while signing up.
![]()
![]()
![]()
![]()

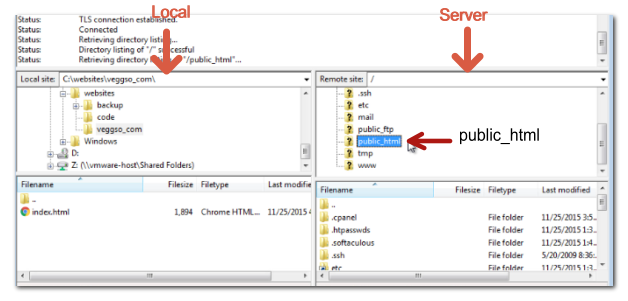
Once you have logged in to FTP, the left panes will show your local folders and the right pane will show the folders in your web server account.
Select the public_html folder in your web server.
Select the local folder where you have your web pages, in the left pane.
![]()
![]()
![]()
![]()
Right click on the index.html file and choose upload. Once you have completed the upload, visit the website in your browser.
![]()
![]()
![]()
![]()

Congrats! you got your pure HTML website online!
![]()
![]()
![]()
![]()

Enhancing your website
At the moment, your website is very basic with little content. Next step is to add more content to your HTML file and keep improving your CSS.
Head to the examples section of bootstrap website. There we have samples of website layouts. For example this one:
justified-nav. Right click and choose view source or press Ctrl+U ( ⌥ ⌘ U on mac) to view the HTML source of the page. Study the example to build your own layout.
After making the updates, re-upload both the HTML and the CSS to your website.
