There are many HTML tutorials available all over the web. However most of them are suitable for the 1990-s era. using tables, <font> to style and those <blink> and marquees!
The web has evolved much after that . So here is a tutorial for the modern times. Share this tutorial with anyone who is starting with HTML. This tutorial is intended to give a strong foundation in the fundamentals of building a website.
What is HTML?
HTML is a markup language. It marks parts of the document with structural, presentational, and semantic information alongside content.
For example, this is simple document with no markup:
![]()
![]()
![]()
![]()

Whereas, the same document with markup below. The markup enhances the document by adding meaning to parts of the document:
![]()
![]()
![]()
![]()

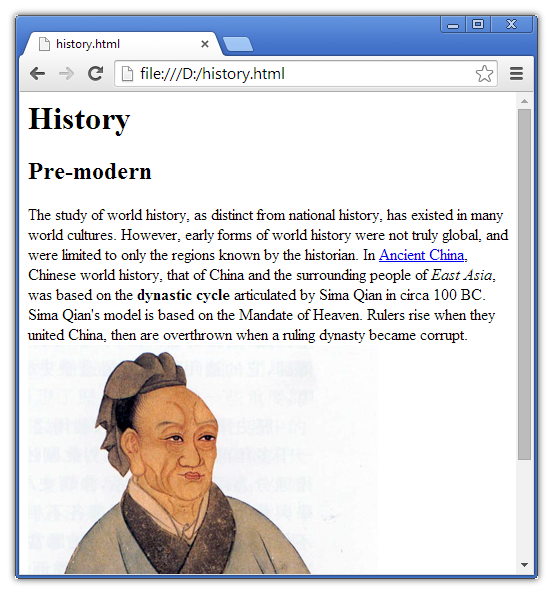
Note that parts of the HTML document are marked with constructs called tags to give better meaning to them. <h1>History</h1> means it is a top level heading. The h1 tags surrounds the heading. <h2>Pre-modern</h2> means it is a second level heading.
The word “Ancient China” is Hyper linked to another document. The reader can follow that link to get more information on the topic.
<img /> is used to embed an image in the document.
This way, an HTML document gives an enhanced experience with hyper links, formatted text with images, video and audio.
The world wide web is, in fact a collection of several millions of such inter-connected HTML documents hosted on websites.
Web Browsers
Web browsers like Internet explorer, Firefox, Google chrome or Safari reads an HTML document and presents it to the user. The markup helps in enhancing the presentation. See this for example:
![]()
![]()
![]()
![]()
As time progressed, not only computers but most smart devices like mobile phones and tablets got the capability to display HTML content.
In addition to browsers, search engines like Google and Bing reads and indexes HTML documents across the internet.
This helps them serve the right web page when a user issues a search.
Pro Tip: You can view the HTML source of any web page by pressing Ctrl+U (Windows) or ⌘-Option-U (Mac) in the browser. Try that. View the HTML source of this page!
The HTML Specifications
There was a need to standardize the HTML specification as many browsers evolved. The World Wide Web Consortium (W3C) develops the world wide web standards including HTML.The latest standard being developed is HTML5.
See W3C
The general structure of an HTML document
Here is the very basic structure of an HTML document:
<!DOCTYPE html>
<html>
    <head>
        <title>The title of the document</title>
    </head>
<body>
    The content of the page.
</body>
</html>
The DOCTYPE tells the browser the version of the HTML you are using. <!DOCTYPE html> tells the browser that this document is HTML5. The entire HTML document is enclosed within <html> and </html> tags.
The document has two parts- a head and body.
The head part enclosed within <head>and </head> is used to describe the document(title, keywords and other useful information). The <title> defines the overall HTML page. The title is used by the browser to display in the title/toolbar. Search engines also give importance to the title since it defines the content of the page. Search results usually display the title in the search results page.
Read More:
The body, enclosed within <body> and </body> contains the content that is displayed to the user.
HTML Tags
![]()
![]()
![]()
![]()

This is a typical HTML tag. the word h1 is the tag name. h1 is used for first level headings.(There are, h1 to h6 levels of headings)
Most HTML tags are in pairs since they mark parts of the document.
There is a start tag and an end tag. (Also known as opening and closing tags)
However, there are a few single tags . Some examples:
<br> that is used to add a single line break
<hr> horizontal line
<input> for input field
Attributes
Each tag can contain attributes specific to the tag. For example see this tag:
![]()
![]()
![]()
![]()

href, src and alt are attributes.
Read More:
Introduction to common HTML tags
Just like any good document, an HTML document can be structured well with headings, sub-headings, paragraphs, bullet points .
HTML Headings
Headings helps organizing your content well. h1 tag is the top most level heading. There are sub-heading levels like h2, h3 h4 etc until h6
Paragraphs
Use the paragraph tags <p> and </p> to organize the content in to paragraphs.
Line breaks
The content flows seamlessly even if you have new lines or spaces in your HTML source. To force a line break, use the <br> tag
Try It!
You can try the tags in the box below. Add some <br> tags, <h1> or <h2> tags and see the result in the ‘Result’ tab.
22934
Bullet points
The common bullet points that you see in web pages is called unordered lists and is created using the tag <ul>. You can create a list of bullet points like this:
<ul>
<li>Item 1</li>
<li>Item 2</li>
<li>Item 3</li>
</ul>
The ul in the <ul> tag means Unordered List.
The <li> tag is used to define the list items.
You can nest a list within another unordered list:
<ul>
<li>Item 1</li>
<li>Item 2</li>
<ul>
<li>Item 2.1</li>
<li>Item 2.2</li>
<li>Item 2.3</li>
</ul>
<li>Item 3</li>
</ul>
Numbered Lists
Numbered lists is similar to unordered list; Just that you have to use the ordered list tag <ol>
For example:
<ol>
<li>Item 1</li>
<li>Item 2</li>
<li>Item 3</li>
</ol>
Ordered list can also be nested.
<ol>
<li>Item 1</li>
<li>Item 2</li>
<ol>
    <li>Item 2.1</li>
    <li>Item 2.2</li>
</ol>
</ol>
Click the Edit link and try adding, removing and nesting in the lists below. Click on the Result tab to see the effect.
22934
Emphasis
It is possible that you want to add emphasis to certain words in the content.
For example,
Cholera spreads by eating food
that is contaminated with
<em>Vibrio cholerae</em>.
When you want to give a stronger emphasis, use <strong>
For example,
<strong>Do not delete</strong> the files
in the <em>system</em> folder
Read More
Block level elements and Inline elements
The HTML elements can broadly be categorized in to two: block level elements and inline elements.
A block-level element creates blocks of content like paragraphs.
A block level element by default starts in a new line and expands in to full width of the parent container.
The paragraph tag is a block level element.
Inline elements flows along with the content. Examples of inline elements are: <a>, <strong>, <em>etc
![]()
![]()
![]()
![]()

Read More
- The Difference Between ‘Block’ and ‘Inline’
- HTML block level and inline elements
- Content categories: Mozilla
URLs
URL is the address of a resource available in the web. The resource can be a document, image video anything.
For example,
http://fastwebstart.com/res/resources.html
is a URL that points to a resources.html document
http://fastwebstart.com/images/web.jpg
is a URL that points to an image.
URL is the abbreviation of Uniform Resource Locator.
Read More
Hyper links
Hyper link allows you to link to other documents from the current document. This way, the user can easily follow to another document.
A hyper link is defined using the anchor (<a> ) tag.
For example:
<a href='http://website.com/page.html'>link</a>
This code links to “website.com/page.html” and clicking on the link takes you to that page
The href attribute points to the other document. The link is also known as URL (universal Resource Locator)
The link can be relative. For example, if the document is on the same website, the link can be:
href=’/folder/page.html’.
If you want to link to another part in the same page, use the #tag where tag is the id of the element. For example, imagine we have a sub heading called “American history” in a long document about world history.
If the id of the heading is ‘american_history’ we can link directly to that section like this:
<a
href='http://www.history-website.com/world-hostory.html#american_history'
>American history</a>
A hyper link can point to documents other than HTML. For example, pdf, jpg Image, mp4 video or even a zip file . When the browser can not display the linked content, it will show a download request box.
HTML5 adds a few more attributes to the anchor tag. You can read more about it in the article below:
Ref:
HTML5 hyperlink attributes : Sitepoint
Images
You can embed an image in an HTML document using the img tag. For example:
<img src='http://website.com/logo.jpg' />
The src attribute points to the image.
It is usually better to give the width and height of the image in the img tag itself.
The width and height are optional that tells the size of the image in pixels. The alt attribute gives an alternative descriptive text for the image. The alternative text is used when the document is rendered to users with screen readers. The alt text helps search engines too.
<img  src='http://website.com/logo.jpg'
width='300' height='420' alt='logo of mywebsite.com' />
Images as hyperlinks
To make an image hyperlink, enclose the img tag within an anchor tag like this:
<a href='http://yourwebsite.com/page.html'
><img src='button.jpg' ></a>
Relative Links and Absolute Links
In the previous examples, we used links like this http://website.com/folder/page.html
If the resource is on the same website itself, then you can skip the domain part and just have the path in the link.
For example, suppose you want to link to a page http://fastwebstart.com/res/resources.html
from a page http://fastwebstart.com/sitemap.html in the same website. Then you can give the link as
<a href='/res/resources.html' > Resources</a>
If both the pages are in the same folder, you can just give the file name in the link:
For example,
if http://fastwebstart.com/res/resources.html is linking to http://fastwebstart.com/res/books.html
then the link could be:
<a href='books.html'>Books</a>
Suppose you want to link to a page in a folder below the current folder, you can just have the link as
subfolder/page.html
For example, if http://fastwebstart.com/res/resources.html wants to link to http://fastwebstart.com/res/lib/java.html
then the link can be:
<a href='lib/java.html'>Java</a>
Or
<a href='./lib/java.html'>Java</a>
Here, “.” means the current folder.
There is a shortcut for parent folder also.
“..” represents the parent folder.
So if http://fastwebstart.com/res/resources.html links to http://fastwebstart.com/sitemap.html then the link could be written as:
<a href='../sitemap.html'>Sitemap</a>
The similar method applies to URLs of images too. For example, if there is a button image here:
http://fastwebstart.com/res/images/button.gif and the http://fastwebstart.com/res/resources.html page can embed the image using the following img tag:
<img src='images/button.gif'>
or
<img src='/res/images/button.gif'>
(URL relative to the domain)
or
<img src='http://fastwebstart.com/res/images/button.gif'>
(absolute URL)
The examples above were to show how the relative links work. Relative URLs can cause problem later if you move the pages around and the folder structure changes. For example, if the resource page resources.html is moved to the root folder, then all the relative links will break. Safer alternative is to use URLS relative to the domain like this:
<a href='/res/books.html'>Books</a>
<a href='/lib/java.html'>Java</a>
<img src='/res/images/button.gif'>
Read More:
- What is the difference between an absolute and a relative URL?
- Why relative URLs should be forbidden for web developers – Yoast
- Relative URLs : WebReference
The essential parts of a web page: HTML, CSS and Javascript
Using the web standards model, we are to use three languages to build a web page. HTML CSS and Javascript.
HTML is used to structure the document
CSS (Cascaded Style Sheet) is to apply visual style (font, colors, border etc) to the document
JavaScript is to add interactive behavior (example: show/hide parts of the page, opening a popup on clicking a link )
![]()
![]()
![]()
![]()

All these working together gives the web page experience to the user
Let us take an example.
We have a simple document here:
<h1>History</h1>
<h2>Pre-modern</h2>
The study of world history,
as distinct from national history,
has existed in many world cultures.
As you can see, the H1 tag tells the browser that the content is a heading. However, it does not mention the color or font of the title. Now we create a CSS style sheet file and link to this HTML document
<html>
    <head>
        <title>The title of the document</title>
        <link rel="stylesheet" type="text/css" href="style.css">
    </head>
<body>
This line tells the browser to apply the styles in the style.css file. In the style.css file, we mention the font and color of the h1 tag like this.
body
{
    font-family: 'Droid Sans', sans-serif;
}

h1
{
    color:red;
}
Now, the style of the heading changes:
![]()
![]()
![]()
![]()

If we don’t mention the style, the browser will apply the default style. So we have to give only the styles that we want to override.
Try it Now!
Click the edit link. Then, try changing the color, size in the CSS style sheet and see the result in the ‘Result’ Tab.
22934
Why this separation (of Document, Style and Behavior ) ?
You might think that this is unnecessary separation. Why can’t We give the styles of the heading in the heading tag itself?
In the earlier days of the web, it used to be like that.
However, as the number of pages grow, even small changes will need edit in all pages. For example, suppose you decided to change the h1 heading color to Red. You have to edit all pages and change its style to keep it consistent all across the web site. Otherwise, some h1 headings will remain blue and some other will remain red and it all becomes messy.
When you have the styles separate in a CSS file, just edit the CSS file for any style change and all the documents that uses this CSS file gets the same style update!
There are more advantages to having the style(CSS), structure(HTML) and behavior separate.
Speed & Efficiency:
The larger your files are, the longer they will take to download. When you have all the styles separate in to a CSS file, the files become smaller. It downloads better and smaller files are easier to update.
Ease of maintenance:
When you want to modify style, you have to edit only the CSS style sheet
Accessibility:
There are users who don’t need the style information. For example, screen readers who read to visually impaired or low vision users. Having just the structure of the document in the HTML helps those screen readers
Device compatibility:
There are different devices where your webpage need to be rendered. For example, smart phones like iPhones, tablet devices like iPads in addition to desktop computers and smart TVs. Having separate style sheet allows you to optimize the CSS style sheet for each device while keeping the HTML documents same.
More on Styling with CSS
CSS gives you the flexibility to apply styles to specific parts of the document. Constructs like CSS class helps you have more detailed control over how the elements are displayed.
Using CSS Classes
Suppose you want to have ‘specialized paragraphs’ that invite attention to a note or a suggestion. You don’t want to apply that style to other paragraphs in the content.
In such cases, we can use the ‘class’ attribute. The ‘class’ attribute can be used to create a specialized class of that element with a different styling.
In our example, let us create a class ‘note’ with a different background color.
22934
Note how the ‘note’ paragraph is defined in the CSS
p.note
{
    background-color:#E0E4CC;
}
Note the dot (.) after the p tag. The dot is used to mean class in CSS.
See how the CSS class is applied in the HTML:
<p class='note'>
....
....
</p>
One element can belong to more than one class. Add the classes separated with a space. For example:
<p class='note message'>Content</p>
IDs for elements
The ID attribute can be used to add a unique identification to an HTML element on the page. For example, imagine you are adding an “author info” paragraph in all posts. You can identify the author info box with an ID.
<p id='authorinfo'>
    Mr Ox is the leader of everything you know.
    Ox completed his primary education and jumped right in to the business of making grand websites
</p>
You can use the id in the CSS to style that element.
p#authorinfo
{
 color:#A7DBD8;
 border:1px solid;
}
The # in the CSS code above indicates that the style is for element with ID ‘authorinfo’.
Unlike class, ID should be unique within a document. One element can have only one ID.
Read More:
Semantic HTML
The idea behind Semantic HTML is simple. It is, writing HTML which has meaning. Under normal circumstances, HTML is primarily used to provide structure for a web page. When using Semantic HTML, you have to move beyond structure to think about whether the tags are meaningful in the particular context.
For instance, consider two popular tags: the <p> and <h1> tag. The <p> tag is used to represent a paragraph, right? And the <h1> is used to represent the “top-level header” – the major headline on the web page. Now, when you use these tags for their respective purposes (i.e. the <p> for a paragraph and the <h1> for the top level header), that is Semantic HTML.
Some web developers use the <p> and <h1> tags for different purposes. For instance an empty <p> tag is sometimes used to add an extra space above or below some content on the web page. Similarly the <h1> tag is sometimes used for the sole purpose of making text bigger. Such usage is considered Non-Semantic HTML.
Semantic HTML discourages using any tag which serves only visual purposes. Two of these tags are the <b> and <i> tag. These tags are basically used for bolding and italicizing text. Such formatting is supposed to be carried out using CSS. Under Semantic HTML, the <b> and <i> tags are replaced with the <strong> and <em> tags respectively.
HTML5 & Semantic HTML
Prior to HTML 5, developers had to rely on <div> and <span> tags to implement different components on a web page. Things like headers, footers, sidebars, quotations, articles etc had to be implemented using a complex collection of nested <div> tags. HTML5 changed all this. It created a slew of tags which can be used to describe almost everything you will implement on your web page. Some of these semantic tags are:
<abbr> An abbreviation
<acronym> An acronym
<address> An address of the document’s author(s)
<blockquote> A long quotation from a body of text
<dfn> A definition
<cite> A citation
<code> A code reference
<q> An inline quotation
Benefits of Semantic HTML
1. Improved accessibility.
Not all people view web pages through visual-based browsers. People with impaired vision use text-to-screen (TTS) readers. Using Semantic HTML can enable such people to understand your web content.
For instance, Having a proper heading structure (h1, h2, h3 etc) allows a user to skim through the contents in the page using the screen reader controls. Similarly, marking the navigation section (<nav>) lets the user skip that section and go to the main content. (rather than hearing the navigation menu every time a page is read)
Read More: Designing for Screen Reader Compatibility
2.Search Discovery
Using Semantic HTML can help Search Engine Spiders. Search Engine Spiders are automated programs that read your webpage parse through it. Having semantic HTML helps them index the page better.
Read More: Google’s fact-checking bots build vast knowledge bank : newscientist.com
3. Readability
Using Semantic HTML makes your code easier to read. This comes in handy when you are working with other developers. Readability can also help in future when you want to update your web page. A web page which is properly organized in a clear, logical manner is much easier to maintain than a jumbled up web page.
Website Layout
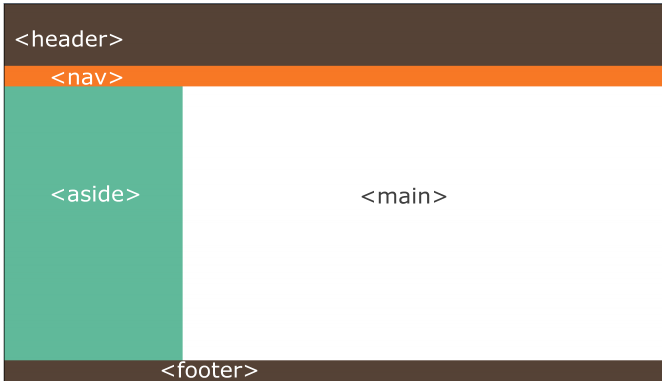
The most puzzling question often asked by new HTML student is how do they make the awesome website layout they see in popular websites and online magazines.
It takes a good amount of effort to build a great website design. However, let us look into the first steps of building a website layout. For the sake of this tutorial, we are going to create a layout which looks like this:
![]()
![]()
![]()
![]()

Although the web page is totally blank, the different colors make it easy to identify the different sections.
- header
- navigation bar
- sidebar
- main content area
- footer
First, we shall choose the different HTML5 layout tags which we shall use to identify the different sections of the web page. Then we shall apply CSS styling.
The core of our layout is going to rely on 5 HTML5 tags.
- <header> for the header,
- <nav> for the navigation bar
- <main> for the main content area
- <aside> for the sidebar
- <footer> for the footer.
Visually, these are tags will be implemented as follows:
![]()
![]()
![]()
![]()
Now that we have identified the tags to use for our HTML5 layout, it is a matter of positioning them on the web page. Below is the <body> tag with basic implementation of the above layout.
<body>
    <header>
        <nav>

        </nav>
    </header>
    <aside>

    </aside>
    <main>

    </main>
    <footer>

    </footer>
</body>
The layout will use percentages to set the widths of the different sections of the web page. As such we need a baseline value from which the width will be calculated. There are different ways of doing this. However, in this case, we shall simply set the width of the <body> tag. body { width: 960px}
The Header
The header is denoted by the <header> tag which is styled as follows:
	header{
		width: 100%;
		background-color: #00FF66;
		height: 120px;
		position: relative;
	}
Most of the above styling is quite straight forward: the width is 100% meaning that it stretches the entire length of the body; the background color is #00FF66 (in RGB format) and the height is 120px.
The Navigation Bar
The navigation bar is denoted by the <nav> tag which is styled as follows:
	nav {
		width: 100%;
		height: 30px;
		position: absolute;
		left: 0;
		bottom: 0;
		background-color: #FF6633;
	}
The one thing worth noting is that the <nav> is absolutely positioned, and is anchored to the left and bottom of the <header> tag (using left:0 and bottom:0 ).
The Side Bar
The side bar is denoted by the <aside> tag which is styled as follows:
	aside{
		background-color: #3399FF;
		width: 25%;
		padding: 10px;
		float: left;
	}
There are two important things to note about the
